53′ Coastal Steam Passenger Ferry
 Starting August 17,2022 you can build along with Bruce Nickerson, owner of Sea Port Model Works, as he guides us through the construction of an HO scale 53′ Coastal Steam Passenger Ferry Boat. Bruce is offering a 25% discount off the price of the kit to New Track modelers who want to build the kit along with him. To obtain this discount for 30 days from the August 17, 2022 start date, either call Bruce at 603.498.3849 and order kit H136W and use the code word “Steamer” or order from his website. The buyer will immediately be issued a refund for the discount amount when they order through the website and write in the name “Steamer”. If they call their order in we will process their credit card for the amount after the discount.
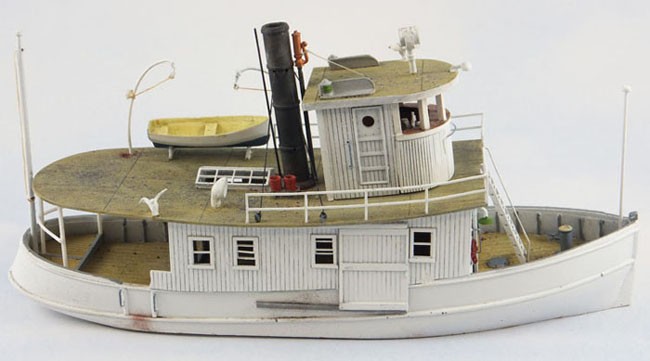
This specific vessel would have been designed, built, owned, and operated by local families, captains, railroads, or investors, etc. The steamer that we present through this kit is similar to the one we are familiar with called the Sabino or originally called the Tourist. The Sabino is up and running in Mystic Ct.at the Maritime Museum. This model is not a model of the Sabino, but similar, and would have been used for very similar purposes. It will carry a lot of passengers, mail, and heavy cargo and attempt to keep schedules. It will make multiple stops at various islands and mainland harbors to deliver and pick up mail, produce, dry goods, livestock, groceries, etc. etc.. This kit, with some minor modifications could be converted to a double decker which would increase passenger Capacity.
This kit represents a small steam powered vessel working on the east or west coast, lakes, rivers, or oceans carrying on commerce that was vital to the growth of our nation, from the mid 1800’s to mid 1900’s. There is so much to say about these steam powered vessels that have a distinct parallel with our nation’s history. I strongly recommend that you read up on the subject. Here are a few great books that you might have a hard time putting down.
- STEAMBOAT DAYS by Fred Irving Dayton
- STEAMBOATS YESTERDAYS (ON CASCO BAY) by Capt. William J Frappier
- STEAMBOATS of GLOUCESTER and the NORTH SHORE by John Lester Sutherland
- STEAMBOATS COME TRUE by James Thomas Flexner
Bruce was recently on our Zoom show and this “BUILD ALONG is a result of modelers interest in his models during his presentation. If you have not built a ship before Bruce says don’t worry it is not much different than building a craftsman structure kit since the hull is a resin one piece part and there is very little rigging to do. I am looking forward to this as it is our first ship building project for the show. Thanks Bruce for your help.
Information about this Build Along
“Nautical Glossary of Terms for Sea Port Model Works Kits”
- AFT or ABAFT or ASTERN- STERN-Rear of vessel, towards the stern.
- BEAM–width of a vessel at its widest point. The wider a vessel is it increases its initial stability.
- BITT-Post on deck used to fasten lines, secure hawsers or for any purpose where heavy strains are to be taken.
- BOLLARD– From “bol” or “bole” the round trunk of a tree. A substantial vertical pillar usually on a pier or wharf, used to attach the mooring lines of a vessel
- BOOM- spar attached to the foot of a fore-and –aft sails. A spar for lifting cargo, or maneuvering objects.
- BOW-Front of vessel.
- BULWARK-The extension of vessel’s side above the level of the weather decks.
- CAPSTAN-A vertical, spool shaped rotating drum around which a chain, cable, or hawser is wound for hoisting anchor, sails, & other objects of heavy weight.
- CLEAT-A fitting (usually bolted to the deck fore and aft next to the bulwark on both starboard and port sides) for securing a line without a hitch (knot)
- COCKPIT-In a lobster boat or sailboat it is that exposed area towards the stern of the vessel but within the freeboard where one would sit or control the rudder from
- COMPANIONWAY –A raised and windowed hatchway in the ship’s deck, with a ladder leading to compartments below
- COWL VENT-Cowl vents allow air into the engine room, or other lower compartments, while water (spray & rain) is kept out. It can be turned in any direction to scoop air into the boat or turned in the opposite direction to pull air out. There is most often a gooseneck “U” passage in the bottom of the vent to catch any water and let it drain overboard before getting into the boat.
- DAVIT-A small crane-like arm, usually to handle a lifeboat or anchor…
- FENDERS-Pieces of rope, wood or old tires hung over the side of a vessel to keep it from damaging other vessels or piers that may contact it
- FLOOD LIGHT-Powerful lights to provide night light on the deck of a working vessel
- GALLOUS FRAMES-These steel fabrications allow the net to be pulled aboard by getting the net high enough to get over the bulwarks.
- GUNWALE-Pronounced gun-el – on an open boat, the top of the sides of the boat, the molding at the top of the sides from where the transom and the sides meet to the stem..
- HULL-The outer skin/shell and framework of a vessel.
- KEEL-The lowest and principal timber of a vessel, running fore and aft the entire length and supporting the frames.
- MIDSHIP-Center of vessel in relationship to bow and stern
- OTTER BOARDS-Device used to spread netting while dragging for fish
- PILOTHOUSE-Cabin on deck for vessel control, communications and navigation. (wheelhouse)
- PORT-Left side of vessel, looking forward
- PORT HOLE-Window/round
- RIGGING-A general term applying to all lines, shrouds & stays
- RUBBING STRAKE-An extra plank fitted to the outside of a hull, usually at deck level, to protect the topsides.
- RUDDER-A steering device which can be placed aft, externally relative to the keel, submerged.
- SAMPSON POST. -A strong post mounted forward & aft for anchor & mooring lines.
- SCUPPER-Originally a series of pipes fitted through the ship’s sides from inside the thicker deck waterway to the topside planking to drain water overboard. Larger quantities of water were drained through freeing ports, which are openings in the bulwarks
- SEARCH LIGHT-Usually mounted in the center of the pilothouse directly over the helmsman’s position.
- SIDE LIGHTS-Also referred to as “running lights”. There are two sidelights, one red (port) and green (starboard). These are mounted on the pilothouse roof and are used for approaching vessels to determine what direction the vessel is moving in relationship to the observing vessel. A screen is required so the lights only show directly ahead to 22 degrees abaft the beam.
- SPREADER-Spar or other firm platform resting down slightly from the top of mast set perpendicular to boom.
- STARBOARD-Right side of vessel, looking forward
- STAYS-Wire or other line running from top of mast to sides and ends of vessel for the purpose of securing the mast in position
- TRANSOM-The flat or slightly curved portion of the hull at the stern, where an outboard motor would be clamped
- WATERLINE-The point on the sides of the vessel that the water comes to when afloat in still water.
- WINCH-A round barrel, vertically placed to the deck (wood or metal) that a line is secured to and wrapped around which when turning allows the line to “let out” or “let in” in a controlled careful way. It may be powered.
KIT PREP AND IMPORTANT NOTES
Some of these notes may or may not apply to the specific model you are working on
GENERAL
- Most of the major components of our kits are handmade and some parts may require modification for proper fit. This is usually accomplished with sandpaper or file.
- The thread in the kit should be stained black for stays and shrouds and tan for running lines such as halyards, sheets, & stays. After staining the thread, it is advisable to run it through beeswax. This protects the thread from moisture.
- When using other manufacturer’s products such as paints, glues, etc. be sure to follow their recommendations.
- When sanding, gluing, or painting use proper respiratory device.
- Use Gap Filling Cyanoacrylate glue for resin assembly. Medium viscosity. Use wood CA for wood assembly. Canopy glue for glazing. Do not glue painted surfaces.
- When referring to the Left or Right of the boat, we are looking from the rear (stern) to the front (bow). Right = Starboard Left = Port Rear = Aft or Stern Front = Bow
- When referring to “glue blocks or strips” we are referring to pieces of styrene or wood cut to a short length, that would be glued to a specific location to further aid in assembly by acting as a stop and glue joint for pieces being glued to that piece.
- In the kits you will find clear acetate, and this is for the windows. Some kits come with uncut sheets of acetate while others come with sheets that have been laser cut to meet the needs of the kit. We use Canopy Glue, Formula “560” to adhere the acetate to the window frames. We do not give you specific instructions as to when the acetate should be installed. This depends entirely on how and when you decide to do the final finishing such as spray paint, clear or high gloss sprays, washes, etc. All of these will have an effect on the acetate. Preplan the installation of the acetate.
- When cutting strip wood or styrene we use a cutter that allows for repeated cuts. We use “the chopper” by Northwest Shortline and set lengths with a caliper or ruler.
RESIN PARTS
- Mold release should be removed from all urethane resin parts to allow for good gluing and painting. We use warm water & dish detergent then rinse in water and dry.
- Most flashing we have removed from all our cast parts (resin or metal). Any remaining may be cleaned up with #11 hobby blade, fine abrasives, files etc.
- There is a minimum number of holes or voids in the resin castings. If necessary, patch with “Squadron” fast drying “green putty” or “Dr. Micro tool putty” to fill voids of any size. When assembling a full hull kit that has a two-part hull it is necessary to use putty to properly blend the bottom and top part together.
- All resin surfaces to be glued should be sanded first with at least a fine sandpaper.
- Resin parts shape or form may be changed by placing them in hot water or heating with a hair dryer.. This might be necessary at times when fitting is required.
WOOD PARTS
- The wood frames that carry the laser cut wood parts are referred to as carriers.
- Sand all edges of the laser cut wood to remove the ash. This will allow for proper gluing and painting. Scrape the inside of windows with back side #11 blade.
- When folding laser board (heavy paper) a slight cutting of the scored line with a # 11 blade works wonders
METAL PARTS
- The metal castings, brass tubing and brass sheets should be cleaned before painting. We use warm water and dish detergent or lacquer thinner to remove oils.
- Brass parts do not need to be soldered. Assembly can be accomplished with the use of CA glue provided the surface to be glued is properly cleaned and perhaps a light sanding with very fine sandpaper.
PAINTING & FINISHING
- We painted our model after the various assemblies were assembled. Carefully think through your painting schedule. Remember it is difficult to glue over painted surfaces.
- All components of the kit should be primed prior to finish painting. Two coats of primer is recommended.
TOOLS AND MATERIALS
Here is a list of some of the items you will need to assemble and finish this model
- Drill bits, (also a pin vise)
- Small files (flat & round)
- Sandpaper 150 to 400 grit
- Sewing needles to pull thread thru drill holes (.020 dia preferred)
- Finishing supplies (paints thinners, wash materials, brushes
- Small 6” rule with 1/32” increments
- #11 cutting blade and handle
- Tweezers
- Wire cutter to cut brass rod
PAINTING AND FINISHING
The following painting instructions are based on how we painted the model that was photographed and appears in these pages, and box wrap, plus some general weathering tips that might be helpful.
TYPES OF PAINTS— We will refer to Americana acrylics as “AMER”. (acrylic or water based).
METHOD OF PAINTING—-We use Dupli-Color spray cans for larger surfaces and brush for smaller details.
WEATHERING
# WASH—We use the wash process often. We think of the process as “layering of weathered surfaces”. It is also the process that ties the final model together. It blends colors together that create a realism that is necessary for an authentic looking model. A wash is a small amount of pigment, (paint, ink, etc.) mixed with a larger amount of thinner.
Examples:
Americana paint and water
India ink and denatured alcohol
These mixtures are literally applied to the painted surfaces with a paintbrush or cotton swab. Do Not agitate the surface just lay it on and let it dry. Excess amounts can be removed with a cotton swab.
In the case of ink, we found that 1 ounce of alcohol to 30-35 drops of India ink is a good starting point. On the other wash mixtures, it is entirely up to you, however, we strongly recommend light pigment mixtures. You can always make it darker, but it is difficult to make it lighter.
#CHALKS—(usually done after paint & wash process) Take desired chalk and rub onto a piece of sandpaper. Use a paintbrush (dry brush) to transfer the pigment from the sandpaper to the desired surface. MODERATION is the key word here.
#DULL COAT—Final step in the finishing process is to apply Testor’s dull coat spray. This aids in blending and sealing the finished surfaces.
#DRY BRUSH—This is a process we use frequently to add a little color influence over another color. Take a paintbrush and dip it into your paint source as you normally would. Before applying the paint to a surface, dry the brush on a piece of paper or paper towel and remove most of the paint. Take the remaining amount and lightly apply it to the desired surface. Repeat this process until the desired effect is found.
Part 1 of the Build Along – August 17, 2022
Part 2 – August 24, 2022
Part 3 – August 31, 2022